The baby has yet to make her appearance (5/6 days till my due date!), so I've been occupying my time finishing up some projects.
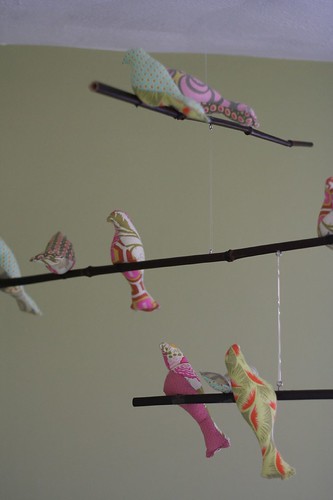
When I first saw this mobile, I knew I needed to make it for my baby's nursery. I sewed the birds for this project awhile back, but was a little intimidated starting the actual mobile part. The last time I made a mobile was in 9th grade science and I vaguely recall using elaborate formulas, scales, and maybe even a bunsen burner or two (okay, maybe not the bunsen burner). My group built a gum mobile and I remember, despite our elaborate calculations, still having to chew off bits of the gum to make our mobile balance properly.

Several years later and without fancy formulas or a scale (or the ability to chew off bits of the birds' tails), but with a glut of cobwebs in the portion of my brain dedicated to science, I was nervous. I turned first to my geeky husband for guidance, who I thought would jump at the chance to tackle a physics puzzle with me. At first, he bluntly shot me down. After my desperate pleas that this was in fact a science project and a real opportunity for both fun and personal satisfaction, he couldn't help but jump into the project. Unfortunately, his interest was shortlived and he left me with the advice, "use trial and error." Hmm, thanks, honey. He did saw the sticks for me before completely abandoning the project. I'll take what I can get, I guess.
Again on my own, I developed my own process for execution (this might be common sense for you, but I thought it might be useful for some)...

1) Arrange birds. I had 11 birds and 3+ sticks. I laid out the sticks and the birds until i found an arrangement I liked.
2) Starting from the bottom, sew the birds to the sticks with dark brown thread. Use several tight loops to ensure birds stay propped on stick and do not droop.
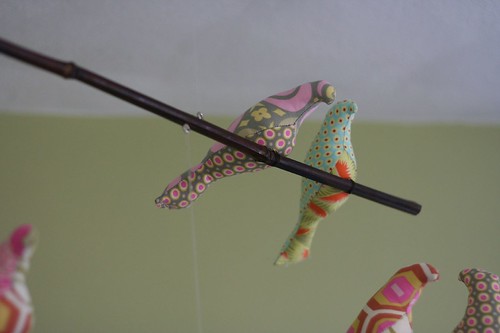
3) Determine center balance point by resting the stick on finger (obviously, very technical). Screw in an eyelet screw at the balance point.
4) Attach fishing line to eyelet screw.
5) Attach eyelet screw to bottom of next highest stick (just guesstimate where you think it belongs; you can work out the balance with the placement of the top eyelet screw) and attach fishing line.
Repeat steps 2 through 5 until you have completed all tiers of the mobile. To make minor balance adjustments, you can shift the birds around a bit.

MATERIALS
Fabric: Amy Butler, Midwest Modern leftovers from the Baby's Quilt and Belle scraps from a yet to be blogged quilt
Fabric: Amy Butler, Midwest Modern leftovers from the Baby's Quilt and Belle scraps from a yet to be blogged quilt
Sticks: J and I went back and forth on this. I wanted to use plain ole sticks from the backyard and even carried home a bunch while on a walk with Miles. J was very against the thought of "dirty, bug-infested" wood hanging over our daughter's crib. I still wanted the appearance of sticks, so I bought painted bamboo pieces from the Big Box Craft Store. Perfect compromise. I still prefer the rustic look of regular sticks, but overall, I'm pleased with the mobile.
Thread
Eyelet Screws (bought in the framing section of Big Box Craft Store)
Fishing Line
Ceiling Hook
Lots more FOs to come, I'm on maternity leave and have been busy!
Comments
uggs uggs
ugg australia ugg australia
ugg sale ugg sale
ugg boots sale ugg boots sale
cheap ugg boots cheap ugg boots
winter boots winter boots
discount ugg boots discount ugg boots
cheap uggs cheap uggs
uggs on sale uggs on sale
australia ugg boots australia ugg boots
ugg boots 2010 ugg boots 2010
ugg boots ugg boots
ugg stiefel ugg stiefel
uggs uggs
ugg australia ugg australia
ugg boots sale ugg boots sale
ugg boots deutschland ugg boots deutschland
uggs on sale uggs on sale
uggs uggs
MBT Outlet MBT Outlet
GHD GHD
G Star Raw G Star Raw
ed hardy ed hardy
Abercrombie And Fitch Abercrombie And Fitch
tiffany jewelry tiffany jewelry
Abercrombie And Fitch Abercrombie And Fitch
Abercrombie And Fitch Abercrombie And Fitch
Cartier Cartier
Gucci Gucci
shamwow shamwow