I’ve spent the last year picking up those foam laptop sleeves and inevitably putting them back down because I knew I could make something just as functional and infinitely more fun. Of course, that year saw my laptop getting tossed in and out of my weekender, me fearing that I would damage it, but the worry never reaching the point where I actually did anything to remedy the situation.
Until this week.
Of course, I didn’t have the foresight to photograph the process, but hopefully my instructions will provide enough direction should you decide to make one for yourself. And I have a feeling I’ll be making more of these in the future.
You'll need:
-Home Dec Weight Fabric - You'll need enough yardage to make the pieces described below. For my netbook, a fat quarter was just enough fabric. I used an Echino fabric from a couple seasons back.
-Batting - I used fusible fleece. 1/4 yard.
-Lining - I used Michael Miller's Organic Cotton Fleece leftover from a blanket I made Alice. Any flannel or soft fabric will work fine.
-Velcro
I dug out some favorite home-dec weight fabric for the exterior and some super soft cotton fleece for the lining. I went so far as to buy a yard of high-density foam to serve as the middle layer, but aborted that plan before I even pulled out my scissors. Instead, I opted for some fusible fleece.
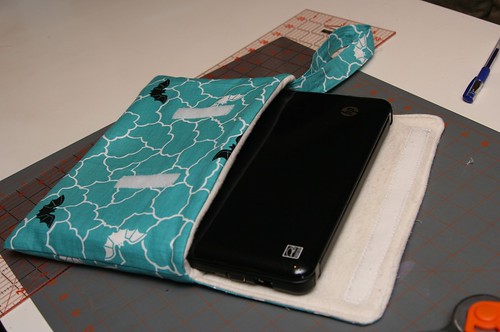
Step 1 – Measure your laptop and determine how to cut fabric.
Front & Back Panels = (L+H+1) x (W+H+1). Cut two each of exterior fabric, lining fabric, and batting.
Flap = (L + 1) x (H + 1). Cut one of exterior fabric, lining, and batting.
Step 2 – If using fusible batting, iron to lining fabric.
Step 3 – Create flap.
-Sew one long strip of Velcro (scratchy side) on long side of lining fabric, one or two inches from the bottom. You can do this step before ironing on the batting, too.
-Pin fabric and lining right-sides together. Sew all sides, except top, together. Turn right-side out. Press. Top stitch around three sewn sides. Set aside.
Step 4 - Sew flap to exterior fabric.
-At unfinished edge, center and pin flap to long edge of exterior back panel. Sew. Keep in mind, flap will be a couple inches shorter than exterior panel.
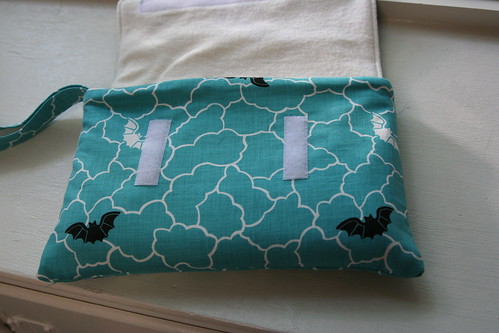
Step 5 - Sew velcro to exterior front fabric.
- Cut two 3 or 4 inch strips of velcro (soft side). Pin, perpendicular from the top of the fabric, a couple inches from each side and an inch or two from top of fabric.
- Sew in place.
Step 6 - Attach exterior panels.
- With right sides together and velcro matching up, pin and sew the two short sides of the exterior panels. Do not sew top or bottom. Turn right-side out.
Step 7 - Attach lining panels.
- With right sides together, pin and sew the two short sides of the exterior panels. Do not sew top or bottom.
Step 8 - Sew strap
- Take a strip of fabric at least a couple inches wide by at least 8 or 10 inches long. Fold in half, right sides together. Sew along long edge only. Turn right side out. Press. Top stitch along each edge. I usually add a few extra top stitching lines for some added flair.
Step 9 - Sew lining to exterior
- Place interior inside of lining. Match up seams. Right sides should be facing each other.
- Pin along top. Along the side seam of your choice, fold your strap in half, raw edges together, to make a loop. Loop side down, tuck the strap in between the lining and exterior layers. The two raw edges of your strap should match up with the raw edges of your lining and exterior. Sew. A walking foot is helpful to sew through all the layers.
- Turn right side out. Pull lining so it is hanging outside of exterior. Pin and sew along bottom seam. A serger makes a nice, clean seam. If you don't have a serger, a zig-zag stitch and trim will do the trick.
- Tuck lining back in. Top stitch along top seam.
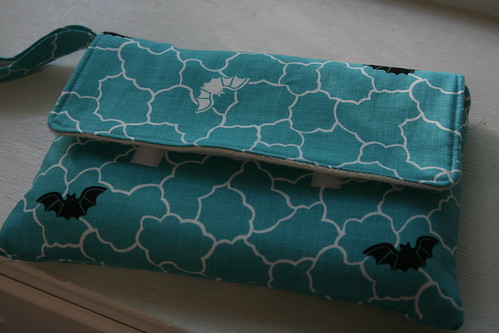
Step 10 - Admire finished product.
Let me know if anything doesn't make sense. Sewing is kind of an iterative process for me, it's difficult for me to remember all the steps unless I keep track as I go along. I should remember that for next time, huh?
Until this week.
Of course, I didn’t have the foresight to photograph the process, but hopefully my instructions will provide enough direction should you decide to make one for yourself. And I have a feeling I’ll be making more of these in the future.
You'll need:
-Home Dec Weight Fabric - You'll need enough yardage to make the pieces described below. For my netbook, a fat quarter was just enough fabric. I used an Echino fabric from a couple seasons back.
-Batting - I used fusible fleece. 1/4 yard.
-Lining - I used Michael Miller's Organic Cotton Fleece leftover from a blanket I made Alice. Any flannel or soft fabric will work fine.
-Velcro
I dug out some favorite home-dec weight fabric for the exterior and some super soft cotton fleece for the lining. I went so far as to buy a yard of high-density foam to serve as the middle layer, but aborted that plan before I even pulled out my scissors. Instead, I opted for some fusible fleece.
Step 1 – Measure your laptop and determine how to cut fabric.
Front & Back Panels = (L+H+1) x (W+H+1). Cut two each of exterior fabric, lining fabric, and batting.
Flap = (L + 1) x (H + 1). Cut one of exterior fabric, lining, and batting.
Step 2 – If using fusible batting, iron to lining fabric.
Step 3 – Create flap.
-Sew one long strip of Velcro (scratchy side) on long side of lining fabric, one or two inches from the bottom. You can do this step before ironing on the batting, too.
-Pin fabric and lining right-sides together. Sew all sides, except top, together. Turn right-side out. Press. Top stitch around three sewn sides. Set aside.
Step 4 - Sew flap to exterior fabric.
-At unfinished edge, center and pin flap to long edge of exterior back panel. Sew. Keep in mind, flap will be a couple inches shorter than exterior panel.
Step 5 - Sew velcro to exterior front fabric.
- Cut two 3 or 4 inch strips of velcro (soft side). Pin, perpendicular from the top of the fabric, a couple inches from each side and an inch or two from top of fabric.
- Sew in place.
Step 6 - Attach exterior panels.
- With right sides together and velcro matching up, pin and sew the two short sides of the exterior panels. Do not sew top or bottom. Turn right-side out.
Step 7 - Attach lining panels.
- With right sides together, pin and sew the two short sides of the exterior panels. Do not sew top or bottom.
Step 8 - Sew strap
- Take a strip of fabric at least a couple inches wide by at least 8 or 10 inches long. Fold in half, right sides together. Sew along long edge only. Turn right side out. Press. Top stitch along each edge. I usually add a few extra top stitching lines for some added flair.
Step 9 - Sew lining to exterior
- Place interior inside of lining. Match up seams. Right sides should be facing each other.
- Pin along top. Along the side seam of your choice, fold your strap in half, raw edges together, to make a loop. Loop side down, tuck the strap in between the lining and exterior layers. The two raw edges of your strap should match up with the raw edges of your lining and exterior. Sew. A walking foot is helpful to sew through all the layers.
- Turn right side out. Pull lining so it is hanging outside of exterior. Pin and sew along bottom seam. A serger makes a nice, clean seam. If you don't have a serger, a zig-zag stitch and trim will do the trick.
- Tuck lining back in. Top stitch along top seam.
Step 10 - Admire finished product.
Let me know if anything doesn't make sense. Sewing is kind of an iterative process for me, it's difficult for me to remember all the steps unless I keep track as I go along. I should remember that for next time, huh?
Comments