
My new crafty digs

When I got pregnant with Alice, we converted our office/craft room into her room.  My sewing machine and piles of associated sewing / craft stuff was relegated to the guest room and closet.  While picking up a sewing machine and carrying it downstairs to the dining room doesn’t seem like that overwhelming a task, I dread it and will knit a sweater or bake ten pies before I carry the machine down a flight of stairs.

71 | 365 summer
workspace


Of course when I do drag the machine downstairs, I take over the dining room and often spill into the kitchen, much to the chagrin of my clean-freak husband.  And of course since Alice was born and we have another on the way, there are eleventy billion cute little baby projects that I must sew.  During my maternity leave, I spent hours sewing during Alice’s marathon newborn naps, the sewing machine humming along while she slept peacefully in her little swing.  Sewing these days requires much more planning and usually only takes place during the hours between Alice’s bedtime and my bedtime, which these days aren’t too far apart.  The occasional times I motivate to drag out my sewing machine, I try and sew everything sewy floating around in my brain so I can avoid carting all my materials back and forth.  Mostly I sew all small projects for Alice.   
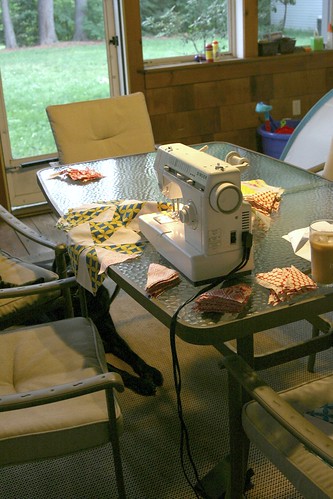
Now that we have another baby on the way, Alice will move into the more spacious guest room, the new baby into Alice’s room, and my ever-growing stash of craft supplies will again be relocated.  Instead of the dragging out my sewing machine every time I want to sew, l’ve been bargaining with J on what’s an appropriate place.  Setting up a sewing area in the living room?  Not okay with him.  Plopping my sewing machine on a cardboard box in our leaky basement?  Not cool with me.  We’re working through it and eventually I’ll get my way we’ll make a perfectly amicable compromise with which both of us can live.  As a bit of an interim solution, I set up camp in our 3-season porch.  I don’t know why I didn’t think of this sooner.  Not only do I get to sew semi-outside, I’m far enough from view that my sewing stuff doesn’t take over the house.  And even on the hottest of days, a little breeze through all the windows and a ceiling fan make everything tolerable, if not enjoyable. 
I’m still working out where I’m going to store everything once I’m officially kicked out of the guest room and my stash moves into the basement (where all the scary things live!) and where my sewing area will move once it gets too cold to sew outside.  Which, in New England is in like a month and a half!
Those of you with tight spaces – how do you handle it?  Do you have a sewing nook or do you set up and break down every time you sew?  Or worse, do you just not sew?

Comments

Unknown said…
I know what you mean. I had the same issues. But now, I share a craft room with my daughter. Her bedroom is my craft room, because she doesn't sleep in her own bed anyway. I just wish I had more time to sit down and ACTUALLY sew. lol.
Glad you like your new craft space
♥Jess
Jennifer said…
Two things I love about this picture. #1 the sweet black lab sitting happily at your feet and #2 it looks like an iced coffee on your table. You pair those 2 things with sewing in a semi outside space and I'm so jealous its ridiculous! Great post.
molly said…
I used to have everything in a closet on our front porch. I moved all of my supplies into the guest room which ajoins our livingroom/diningroom. My supplies and machine are contained in a hutch that has a locking cabinet and drawers. My fabric is all stacked neatly on top of that hutch in one of those cube organizer type pieces of furniture which is kind of like a bookcase.
I sew in our diningroom. And I sew much more frequently now that my fabric is in plain view and I don't have to go onto the cold porch to get my stuff.

Popular posts from this blog

Box Bag Tutorial

A couple of you inquired whether I made this pouch based on a tutorial or pattern and if not, if I could provide one. Ask and you shall receive! I've learned so much from tutorials out on the internets, I'm happy I can give back for once. Bear with me, though. This is my first tutorial and creating one is much tougher than I imagined. I give anyone who's created a tutorial tons of credit! I feel obligated to preface this by admitting I'm a trial and error sewer. I make things up as I go along and test things during the sewing process to see if I'm achieving my desired results. Also, I taught myself to sew just playing around on a sewing machine, so I don't always use text book methods. Just wanted come clean before you all jump into this and so you have a little understanding if I did something in a backass way. The pattern works, which is all that matters to me! Because of the versatility of this pattern, my instructions can be used more as guidelines. You can

Done: Weekender Bag

Happy 2007! I hope you all had a good time ringing in the new year. I have some lofty goals for this upcoming year and some musings on last year, but that's for another post because-- Finally! (the top looks kind of bumpy. I think it looks crisper when I'm holding it.) Pattern. Weekender Bag by Amy Butler Exterior Fabric. Amy Butler, Sunbloom Collection Cording Fabric. Amy Bulter, Charm Collection Lining. Khaki Fabric from Joann's I relied a lot on the tips from other bloggers who made this bag and wanted to give something back to the blogging community, so here are my.... 10 THOUGHTS & TIPS ON THE WEEKENDER 1. Dominating the cording. As the layers increased in the sewing, keeping the cording sandwiched in place became challenging. I had the best luck pinning the fabric together parallel to the fabric edge, rather than perpendicular. Stopping so often to remove pins got a little annoying, but was better than ripping and resewing. 2. Topstitching = Enemy number 1. I d

Granola.

In all my years of baking, I don’t think there’s any one food I’ve tinkered with more than granola.  Actually, that’s a lie. Let me try again. Besides chocolate chip cookies, there's no food I've tinkered with more than granola.   But granola! The goal: delicious, crunchy yet chunky enough to eat on its own, and not just dessert masquerading as a healthy snack. Doesn’t sound too hard.  But… the best tasting is inevitably the worst for you (not to name names...Panera copycat recipe). Consistency should not be a trail mix of sugared oats and nuts and fruit. There should be chunks you can hold without crumbling.   So, when I stumbled upon a granola so good the restaurant sends guests home with their own little prepackaged personal sized portion, I had to give it a try. And to document my trials so when I inevitably forget the recipe, I'm writing this post so it’s here waiting and ready. (And maybe, you, too, have been seeking that perfect granola recipe??)