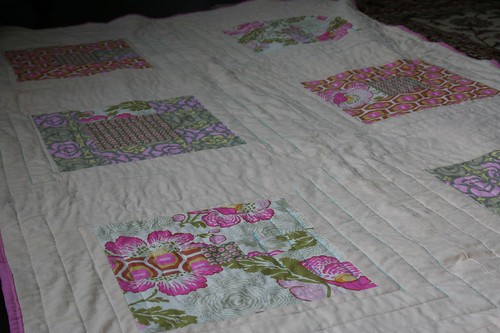
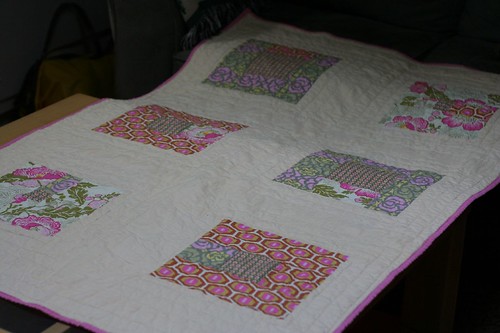
I'm still in the midst of my pregnancy-induced nesting binge, so I'll continue on in my parade of baby-related FOs. Here's the latest, my first completed (notice I didn't say started) quilt...

Pattern: What a Bunch of Squares from Denise Schmidt Quilts
Fabric: 1/4 yard each of 4 Amy Butler Prints from her Midwest Modern Collection, 1.5 yards light yellow Kona Cotton, 2.5 yards Amy Butler Quilting Solids in bright pink for backing.
Let it be known that I'm the most indecisive person on the planet. It takes me forever to make a decision and when I finally do, I still question it. Choosing the yellow was my most difficult decision in the quilt store. I wanted something subtle, which was not easy to find with a mix of warm and cool prints. While constructing the quilt top, I wavered back and forth whether I made the right decision to concentrate all the printed fabric into the squares. It looked to me like little color explosions in the midst of a wide expanse of washed out yellow.

Once I started the actual quilting part, I became enamored with the quilt. The punchy little boxes became delicate color cubes, reminiscent of log cabin squares. The topstitching that framed each square popped in the muted background. Not only was I in love with the quilt, but with quilting itself, the exact part of the quilting process I found most intimidating. I became so empowered that after finishing this quilt, I pulled out a full/queen-sized quilt top I finished this winter and quilted that, too! (Pictures/Write-up forthcoming).

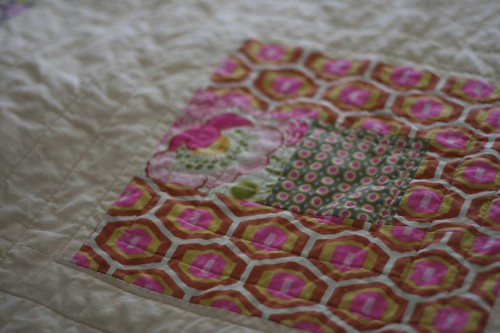
My favorite square
Little details:
I quilted this as directed in the pattern - six sets of squares 1 1/4 inches apart per block.
I need to be less lazy and not try to sew over safety pins. I think I broke 4 needles this way. Oops.
While I used the pattern from DSQ, I followed many of the techniques outlined in The Modern Quilt Workshop:


Also, special thanks to Elizabeth at A Mingled Yarn (who is also expecting a girl in November!) for giving me the Arte y Pico Award! It's my first blog award!
I'll pass the award onto...
Nova at NovaMade
Jackie at Yarnish
Veronique at Tres Chic Veronique
Lobstah at Lobstah Life
Minty at Pepperknit
It was hard to pick just five blogs, but these are some that I rush to read as soon as they are bolded in my bloglines. You all have kept me inspired, made me laugh out loud, or just kept me entertained with your projects and musings! Thanks for that!
Rules
1) You have to pick 5 blogs that you consider deserve this award, creativity, design, interesting material, and also contributes to the blogger community, no matter of language.
2) Each award has to have the name of the author and also a link to his or her blog to be visited by everyone.
3) Each award-winning, has to show the award and put the name and link to the blog that has given her or him the award itself.
4) Award-winning and the one who has given the prize have to show the link of "Arte y pico" blog , so everyone will know the origin of this award.
5) To show these rules.
Pattern: What a Bunch of Squares from Denise Schmidt Quilts
Fabric: 1/4 yard each of 4 Amy Butler Prints from her Midwest Modern Collection, 1.5 yards light yellow Kona Cotton, 2.5 yards Amy Butler Quilting Solids in bright pink for backing.
Let it be known that I'm the most indecisive person on the planet. It takes me forever to make a decision and when I finally do, I still question it. Choosing the yellow was my most difficult decision in the quilt store. I wanted something subtle, which was not easy to find with a mix of warm and cool prints. While constructing the quilt top, I wavered back and forth whether I made the right decision to concentrate all the printed fabric into the squares. It looked to me like little color explosions in the midst of a wide expanse of washed out yellow.
Once I started the actual quilting part, I became enamored with the quilt. The punchy little boxes became delicate color cubes, reminiscent of log cabin squares. The topstitching that framed each square popped in the muted background. Not only was I in love with the quilt, but with quilting itself, the exact part of the quilting process I found most intimidating. I became so empowered that after finishing this quilt, I pulled out a full/queen-sized quilt top I finished this winter and quilted that, too! (Pictures/Write-up forthcoming).
My favorite square
Little details:
I quilted this as directed in the pattern - six sets of squares 1 1/4 inches apart per block.
I need to be less lazy and not try to sew over safety pins. I think I broke 4 needles this way. Oops.
While I used the pattern from DSQ, I followed many of the techniques outlined in The Modern Quilt Workshop:
- I did not cut my bias tape on the bias. My quilt didn't explode or anything!
- Rather than machine stitch one side of the binding then handstitch the other side, I used my machine and stitched the whole thing in one fell swoop.


Also, special thanks to Elizabeth at A Mingled Yarn (who is also expecting a girl in November!) for giving me the Arte y Pico Award! It's my first blog award!
I'll pass the award onto...
Nova at NovaMade
Jackie at Yarnish
Veronique at Tres Chic Veronique
Lobstah at Lobstah Life
Minty at Pepperknit
It was hard to pick just five blogs, but these are some that I rush to read as soon as they are bolded in my bloglines. You all have kept me inspired, made me laugh out loud, or just kept me entertained with your projects and musings! Thanks for that!
Rules
1) You have to pick 5 blogs that you consider deserve this award, creativity, design, interesting material, and also contributes to the blogger community, no matter of language.
2) Each award has to have the name of the author and also a link to his or her blog to be visited by everyone.
3) Each award-winning, has to show the award and put the name and link to the blog that has given her or him the award itself.
4) Award-winning and the one who has given the prize have to show the link of "Arte y pico" blog , so everyone will know the origin of this award.
5) To show these rules.
Comments
uggs uggs
ugg australia ugg australia
ugg sale ugg sale
ugg boots sale ugg boots sale
cheap ugg boots cheap ugg boots
winter boots winter boots
discount ugg boots discount ugg boots
cheap uggs cheap uggs
uggs on sale uggs on sale
australia ugg boots australia ugg boots
ugg boots 2010 ugg boots 2010
ugg boots ugg boots
ugg stiefel ugg stiefel
uggs uggs
ugg australia ugg australia
ugg boots sale ugg boots sale
ugg boots deutschland ugg boots deutschland
uggs on sale uggs on sale
uggs uggs
MBT Outlet MBT Outlet
GHD GHD
G Star Raw G Star Raw
ed hardy ed hardy
Abercrombie And Fitch Abercrombie And Fitch
tiffany jewelry tiffany jewelry
Abercrombie And Fitch Abercrombie And Fitch
Abercrombie And Fitch Abercrombie And Fitch
Cartier Cartier
Gucci Gucci
shamwow shamwow